Few things are more satisfying than a beautiful outdoor space. With a little ingenuity and effort, you can make your back deck, patio or porch even more inviting – and you don’t have to be a professional designer to do it.
Here are two fast and easy DIY (Do it yourself) projects to beautify your home. Have fun and add sparkle to your backyard this summer, without spending much money or time. You can do it!
Project #1: Tin can lanterns
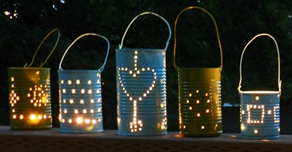
Add charm and elegance to your outdoor summer space with these colourful DIY lanterns.
You will need:
- recycled tin cans
- hammer
- nail
- bailing wire
- pliers
- tea light candle or mini LED candle
- Indoor/outdoor spray paint (blue and green)
How to:
Step 1: Remove labels and glue from the cans. WD-40 works well.
Step 2: Fill the cans with water and place them in the freezer. Leave them in the freezer until the ice is solid. This helps the can hold its shape for the next steps.
Step 3: Take your frozen can out of the freezer. Using a hammer and nail to pound a hole near the top of the can. Flip the can over and make another hole straight across from the first hole. These will be used for the handle later on.
Step 4: Make your design. Use the hammer and nail to punch out a design in your can. You can draw it out before hand or make it up as you go.
Step 5: Once your design is all finished, let the ice melt out of the can and dry it out.
Step 6: Upon turning the can over, you'll see a big bulge in the bottom. This comes from the freezing water in it. Just pound it down with a hammer so that it sits flat.
Step 7: Make a handle: Cut a 12-inch strip of bailing wire and curve the end of it to form a hook. Thread the hook through one of the top side holes.
Step 8: Twist the hook around to secure it. Make a hook on the other end of the wire. Stick it in the side hole on the other side and twist it around. Now you have a handle!
Step 9: It’s time to spray paint. Paint several coats on to cover the entire outside of the can and handle.
Step 10: Once the paint is dry, insert tea light candles and light them up! Your lantern is complete!
Project #2: Cinder block bench
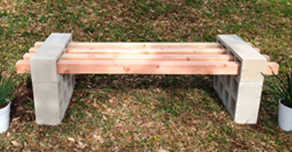
Simple, inexpensive and unique, this bench can be enhanced with cushions or used as a rustic addition to your garden. The cinder blocks also act as side tables for your guests’ drinks and small plates! You can make this bench in less than an hour!
You will need:
- 12 cinder blocks, 8” x 8” x 16”
- 4 - 4'x4' x 8' pieces of wood
- Thompson’s Waterseal
- Liquid Nails
How to:
Step 1: Coat the wood with Thompson's Waterseal to protect it from the elements. You can also stain the wood if you want.
Step 2: Level the ground where you are placing the bench.
Step 3: Finalize placement of the 12 blocks (6 on each side, with 4 standing upright vertically, and 2 stacked on top of them horizontally).
Step 4: (optional) For some added structural stability, secure the blocks together using Liquid Nails.
Step 5: Insert the 4x4’s through the top 4 holes.
Step 6: Take a seat on your new bench. You are ready to enjoy the summer!
Original Idea: Fab Everyday blog
Secrets to successful container gardening
DIY summer outdoor structures